How to Make Paper Beads from Magazine Pages
Cut long tapered triangles from magazine pages, roll them around a skewer, glue the tip and seal. Includes a table showing how strip size changes the bead, plus three simple uses.

Tutorial at a glance
Materials
- 4 or 5 magazine pages
- Round toothpicks or thin wooden skewers
- White glue or a glue stick
- Water-based sealer or diluted white glue
- Elastic cord, twine or strong thread
- 1 small cardboard box for a drying rack
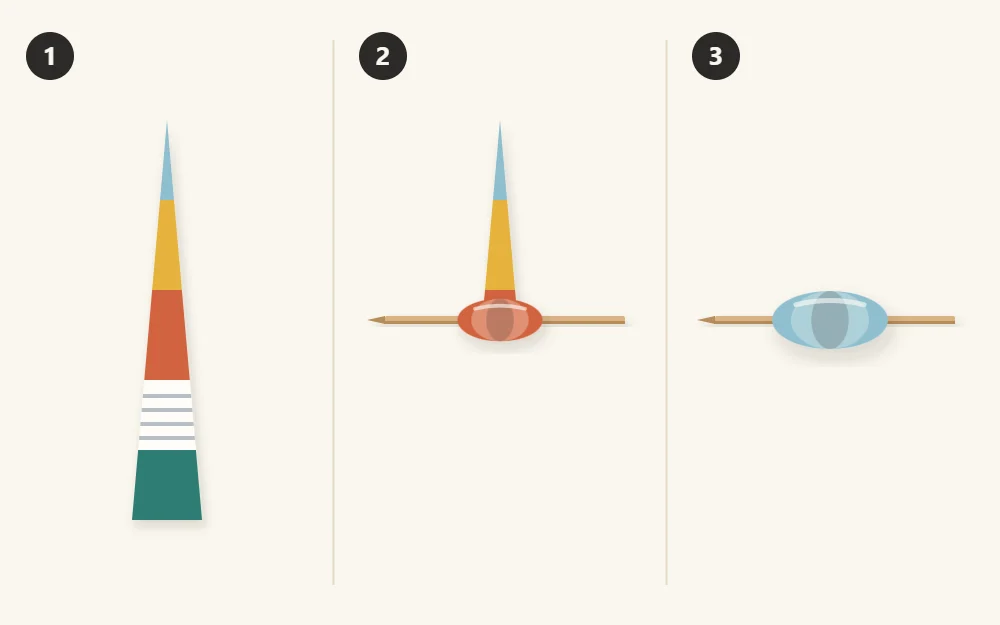
Paper beads are rolled from long triangles of magazine paper, and the only color you see on the finished bead is the thin line along the edge of the strip. That is what makes them interesting: a page of dense text becomes a gray-striped bead, and a page with a red border becomes a red one.
The method is simple and repetitive in a pleasant way. Cut, roll, glue, seal, string. Once you have made five or six, your hands learn the tension and the beads start to match.
What you need
- 4 or 5 magazine pages
- Round toothpicks or thin wooden skewers
- White glue or a glue stick
- Water-based sealer, or white glue thinned with a little water
- A small soft brush
- Scissors, pencil and ruler
- A small cardboard box to use as a drying rack
- Elastic cord, twine or strong thread for stringing
Choose pages by their edge color
Ignore the picture on the page and look at the long edges of the strip you plan to cut. As the triangle winds around itself, each turn leaves a narrow band of whatever was printed along its sides. Solid blocks of color give a clean, even bead. Photographs give a speckled blend. Text gives fine gray stripes.
Glossy magazine paper rolls tightly and takes sealer well. Thicker cover stock makes fatter beads from shorter strips. For a matched set, cut all the strips from pages with similar tones.
Mark and cut the triangles
Work across the short side of the page so each strip runs the full length of the sheet, roughly 11 in (28 cm).
- Along the bottom edge of the page, make a pencil mark every 1 in (2.5 cm).
- Along the top edge, make the first mark 1/2 in (1.3 cm) from the corner, then every 1 in (2.5 cm) after that, so the top marks sit halfway between the bottom ones.
- Rule lines from each bottom mark to the two nearest top marks. This zigzag gives a row of long triangles with almost no leftover paper.
- Cut along the lines with scissors. Stack two or three pages to cut several sets at once.
The two half triangles at the sides of the page are too narrow for these beads, but they are worth keeping. Slivers like these can go into layered scrap paper bookmarks.
How strip size changes the bead
The wide end of the triangle sets the length of the bead. The length of the strip sets how fat it becomes. The outline of the strip sets the shape.
| Strip shape | Wide end | Strip length | Bead you get |
|---|---|---|---|
| Long triangle | 1 in (2.5 cm) | 11 in (28 cm) | Classic oval, medium size |
| Narrow triangle | 1/2 in (1.3 cm) | 11 in (28 cm) | Small, nearly round |
| Wide triangle | 1 1/2 in (4 cm) | 11 in (28 cm) | Long, slim oval |
| Straight strip | 1/2 in (1.3 cm) | 8 in (20 cm) | Plain tube, good as a spacer |
For a fatter bead in any shape, glue two strips end to end before rolling, or switch to thicker paper.
Roll and glue
- Lay a triangle face down. Place the skewer across the wide end and fold the paper edge snugly over it.
- Roll the paper around the skewer with your thumbs and forefingers, keeping the strip centered so the bead builds up evenly on both sides.
- Keep steady tension. If the roll drifts to one side, unroll a few turns and correct it.
- When about 2 in (5 cm) of the tip remains, spread a thin line of glue along it, finish rolling and hold the point down for a few seconds.
- Give the bead a slight twist to loosen it, but leave it on the skewer for sealing.
Tip
The first turn decides everything. If the wide end goes on straight and tight, the rest of the strip follows it. A loose start gives a bead with a large, floppy hole.
Seal and dry on skewers
Unsealed beads unravel and scuff quickly. Brush a thin coat of water-based sealer or diluted white glue over each bead while it is still on the skewer, turning the skewer to reach all sides. Make sure the glued tip is well covered.
Space three beads along each skewer so they do not touch, then rest the skewers across the open top of a small cardboard box. Nothing touches the wet surface, so the beads dry without flat spots. Leave them for about an hour, add a second coat, and let them dry for several hours or overnight before stringing.

Twist each bead on its skewer once or twice during the first hour so the sealer does not bond it to the wood. Sealed beads shrug off a splash, but they are still paper: take a bracelet off before washing dishes or swimming.
Watch out
Finished beads are small. Keep them, and the toothpicks, away from young children and pets, and supervise older children when they string them.
Three simple ways to use paper beads
Bracelet
Thread 14 to 18 medium beads onto elastic cord, check the fit around your wrist and tie a firm double knot. Slide the knot inside a bead to hide it.
Keychain
Fold 10 in (25 cm) of twine in half through a split key ring, thread both ends through three or four beads and finish with a tight overhand knot.
Garland
String beads onto twine with a knot on each side of every bead to hold the spacing. Mixed shapes look good here, and so do tube spacers between ovals.
A handful of loose beads with a length of cord and a blunt needle also makes a small craft kit. The article on jar gift ideas shows how to pack one. If you enjoy rolling paper, the same magazines can become rolled magazine coasters, which use folded strips coiled flat instead of wound into beads.
Frequently asked questions
How many beads can I get from one magazine page?
A standard page marked at 1 in (2.5 cm) intervals gives about 15 full triangles, since the zigzag layout uses both directions across the sheet. Narrower triangles give more beads per page. Count on needing 14 to 18 medium beads for an adult bracelet, so one or two pages is usually enough.
Why is the hole in my bead too big or uneven?
The hole matches whatever you rolled around, so a thick skewer makes a wide hole and a toothpick a narrow one. An uneven or floppy hole usually means the first turn was loose. Fold the wide end tightly over the stick before rolling, and keep steady tension all the way to the tip.
Do I have to seal paper beads?
Sealing is strongly recommended. Bare paper scuffs, absorbs moisture from skin and can start to unwind at the tip. Two thin coats of water-based sealer or diluted white glue stiffen the bead and hold the end down. Thin coats dry clearer and smoother than a single heavy one.