Magazine Page Envelopes: A Template You Can Reuse
Trace an opened envelope onto cereal box card to make a reusable template, then cut and fold envelopes from magazine pages, calendars and maps. Includes folding order and gluing.

Tutorial at a glance
Materials
- 1 envelope to copy
- Cereal box card, one flat panel
- Magazine, calendar or map pages
- Glue stick or double-sided tape
- Plain white paper or blank labels
Magazine page envelopes take a few minutes each once you have a template, and the template is the part worth doing properly. Trace an ordinary envelope onto thin cardboard once, and you can cut matching envelopes from magazines, calendars and maps for years.
The steps below start with that reusable template, then cover choosing pages, the folding order and where the glue goes. A short section at the end explains what changes if an envelope is going in the mail instead of being handed over.
What you need
- 1 envelope in the size you want to copy
- Cereal box card, a flat panel larger than the opened envelope
- Magazine pages, old calendar pages or maps
- Pencil and scissors
- Glue stick, or double-sided tape
- A ruler and a blunt tool for creasing, such as the back of a butter knife
- Plain white paper or blank labels for the address
Make the cardboard template
Pick an envelope that fits the cards or notes you send most often. A small note-card envelope fits on a single magazine page. A larger greeting-card envelope usually needs a calendar page or a map.
- Open the envelope carefully along its glued seams. Slide a finger or a butter knife under each seam and ease it apart slowly, so the paper does not tear.
- Flatten the opened envelope. It will be a diamond or rough square with four flaps: two sides, a bottom and a top.
- Lay it on the plain side of the cereal box card and trace around it with a sharp pencil, holding it flat with your free hand.
- Cut out the shape with scissors, following the inside of the pencil line.
- Mark the four fold lines. Fold the paper envelope back into shape, note where each crease meets the edge, and make a small notch or pencil tick at those points on the card.
Write the envelope size on the template and keep the original paper envelope with it as a folding reference. Cereal box card is the right weight for this: stiff enough to trace around, thin enough to cut with scissors. A flat envelope in your craft stash holds templates neatly, and the guide to craft materials worth saving has more on storing flat card and paper.
Choose your pages
Paper weight matters more than the picture. Thin, floppy magazine pages tear at the folds and let the contents show through. Look for these instead:
- Magazine covers and thick feature pages: sturdy, with large images
- Wall calendar pages: heavy paper, big enough for larger envelopes
- Old road maps and atlas pages: strong paper that folds crisply
- Catalog pages with a full-page photo: good for small sizes
Move the template around the page before tracing. The center of the template becomes the front of the envelope, so place the best part of the image there. Landscapes, patterns, skies and textures work better than faces, which get cut off by the flaps.
Trace and cut
Lay the page face down, set the template on top and trace around it with a pencil. Tracing on the back keeps pencil marks off the outside. Transfer the fold marks by making a small tick at each notch.

Cut just inside the line with scissors.
Fold in the right order
Score each fold before making it: line up a ruler between two matching tick marks and run the blunt tool along it. Scored folds are straight and do not crack the printed surface.
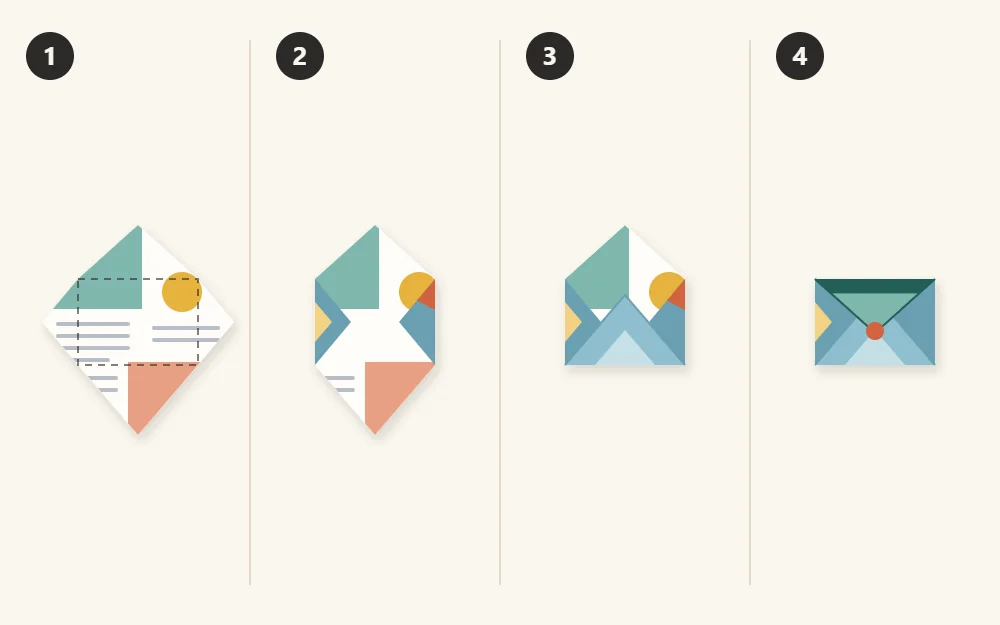
- Start with the flat cut shape, printed side down, with the top flap pointing away from you.
- Fold the two side flaps in toward the center and crease them firmly.
- Fold the bottom flap up over the side flaps and crease it. Do not glue yet.
- Fold the top flap down to check that it closes neatly over the others. This gives the finished closed envelope shape.
Glue only the bottom flap edges
Unfold the bottom flap again. Run the glue stick along its two slanted edges only, in a strip about 1/4 in (6 mm) wide, then fold it back up and press it onto the side flaps.
Keep glue away from the middle of the flap and from anything that will be inside the pocket. Glue in the wrong place sticks the front to the back, and the envelope will not open.
Slide a scrap of paper inside while you press, then pull it out. If it comes out clean, the pocket is clear. Lay the envelopes under a heavy book for about 15 minutes so they dry flat.
Tip
Glue stick suits glossy magazine paper better than liquid white glue, which can wrinkle thin pages as it dries. For a stronger seam on heavy calendar paper, use a narrow strip of double-sided tape.
The top flap stays unglued until you use the envelope. Seal it then with glue stick, a strip of decorative tape or a sticker.
Add a label for the address
Writing does not show up on a busy printed page, and most pens skid on glossy paper. Cut a rectangle of plain white paper, about 2 x 3 1/2 in (5 x 9 cm) for a small envelope, and glue it to the center of the front.
For envelopes that will be handed over with a gift, a smaller label with only a name is enough. These pair well with the wrapping options in recycled gift wrap ideas, and a small envelope glued inside the back cover of a cereal box notebook makes a pocket for loose notes.
If you plan to mail them
Handmade envelopes can go through the mail, but sorting machines and carriers need to read them easily. A few points help:
- Copy a standard envelope size so the shape is one the postal service already handles.
- Give the address a clear, plain area: a white label with dark ink, with no printed text from the page close to it.
- Leave the top right corner free for the stamp, and stick it to plain paper if the page is very glossy.
- Seal every edge of the flaps so nothing can catch.
- Use the heavier papers. Thin pages are better kept for hand delivery.
Watch out
Postal rules on size, thickness and addressing vary by country and change over time. Check the current requirements with your postal service before mailing a batch, and use an ordinary envelope for anything important.
Frequently asked questions
What size envelope can I make from one magazine page?
A standard magazine page fits the opened-out shape of a small note-card or gift-card envelope. Lay your template on a page before committing: if any flap hangs over the edge, choose a smaller envelope to copy or switch to larger paper such as a wall calendar page or a map.
What is the best glue for magazine paper envelopes?
A glue stick is the easiest choice because it adds very little moisture, so thin glossy pages stay flat. Narrow double-sided tape gives a stronger seam on heavy calendar or map paper. Liquid white glue works in a very thin line but tends to wrinkle lightweight pages as it dries.
Can I make a template without taking an envelope apart?
Yes. Place the card you want to send in the center of a sheet of paper turned like a diamond, fold the four corners over it, and trim until the flaps overlap by about half an inch. Unfold that paper pattern and trace it onto cereal box card.