Cardboard Picture Frame: A Sturdy Frame from a Shipping Box
Build a standing or hanging frame for a 4 x 6 inch print from one corrugated box, with a window front, a slot for the picture and a fold-out stand.

Tutorial at a glance
Materials
- 1 clean corrugated box with flat panels
- Decorative paper or fabric, about 10 x 8 in (25 x 20 cm), or acrylic craft paint
- White (PVA) glue or tacky glue
- Masking tape or paper tape for the hinge
- Short length of twine or ribbon for an optional hanging loop
- One 4 x 6 in (10 x 15 cm) print
A cardboard picture frame is one of the most useful things you can make from a shipping box. Corrugated cardboard is stiff enough to stand on a shelf, light enough to hang from a small loop, and easy to cover so nobody sees the box it came from.
This version holds a 4 x 6 in (10 x 15 cm) print in landscape format. It is built from three flat parts, and the print slides in from the top, so you can swap the picture whenever you like without taking anything apart.
How the frame goes together
The frame is a sandwich. A front panel with a window sits on top, a plain back panel sits underneath, and three narrow spacer strips are glued between them along the two sides and the bottom. The strips hold the panels slightly apart, which leaves a slot open at the top edge. A triangular stand, hinged with tape, keeps the frame upright.
Because the window is a little smaller than the print, the front panel overlaps the picture on every side and hides its edges.
What you need
- A clean, dry corrugated shipping box with flat, uncreased panels
- Pencil, metal ruler and a cutting mat
- Craft knife with a fresh blade
- White (PVA) glue or tacky glue
- Masking tape or paper tape for the stand hinge
- Decorative paper, a fabric remnant or acrylic craft paint for the front
- Clothespins or a few heavy books for pressing
Measure and mark the parts
Choose the flattest part of the box and avoid fold lines, tape and printed shipping labels. Mark every part with the ruler before you cut anything, and check the corners against the corner of a book or the grid on your mat so they are true right angles.
| Part | Size | How many |
|---|---|---|
| Front and back panels | 8 x 6 in (20 x 15 cm) | 2 |
| Window in the front panel | 5 1/2 x 3 1/2 in (14 x 9 cm), centered | 1 |
| Side spacer strips | 3/4 x 6 in (2 x 15 cm) | 2 |
| Bottom spacer strip | 1 x 6 1/2 in (2.5 x 16.5 cm) | 1 |
To center the window, draw a line 1 1/4 in (3.2 cm) in from each edge of the front panel. The rectangle those four lines enclose is the window.
For the stand, draw a right triangle about 5 in (13 cm) tall with a 3 in (7.5 cm) base. Lay it out so the ribs inside the cardboard run up its height, which makes it much harder to bend.
Cut the cardboard
Cut on the mat with the craft knife held against the metal ruler. Make several light passes instead of one heavy one, keep the hand that holds the ruler behind the blade, and cut away from it. If you are crafting with children, an adult does the knife work.
Cut the window first, while the front panel is still easy to hold flat. Stop each cut exactly at the corner so the blade does not run past it and leave a nick in the border. If corrugated cardboard is new to you, the guide on how to cut cardboard cleanly explains rib direction and window cuts in more detail.

Cover the front panel
Decorate the front before assembly, while it still lies flat. You have three easy choices.
- Paper: cut a piece 1 in (2.5 cm) larger than the panel on every side. Glue the panel face down onto it, trim the corners at an angle and fold the edges to the back. Cut an X in the paper from corner to corner of the window, then fold the four flaps through and glue them down.
- Fabric: work the same way with a thin cotton remnant and tacky glue, spread thinly so it does not soak through.
- Paint: brush on two thin coats of acrylic craft paint, letting the first dry. Paint the cut edges of the window as well, since they show.
Pieces left over from wrapping gifts with paper and fabric you already have are usually the right size for this job.
Assemble the frame
- Lay the back panel flat. Glue one side strip along each short edge, flush with the outside.
- Glue the bottom strip between them, flush with the bottom edge. The space left inside is 6 1/2 in (16.5 cm) wide, a little wider than the print.
- Run a thin line of glue along the top of all three strips. Keep it away from the inner edges so nothing squeezes into the slot.
- Lower the front panel on top, decorated side up, and line up all four outside corners.
- Press under a few books for about an hour. Slide a scrap of card into the slot while it dries to keep it open.
Tip
Corners drift while glue is wet. Push the frame against something square, such as the inside corner of a box lid, before you add the weight.
Add the stand or a hanging loop
Hold the triangle against the back of the frame with its long straight edge running vertically down the center and its short edge level with the bottom. Tape along that long edge on both faces to make a hinge, then swing the triangle out to a right angle. To make the frame lean back slightly, trim a thin sliver off the bottom of the stand, taking a little more at the outer point than at the hinge.
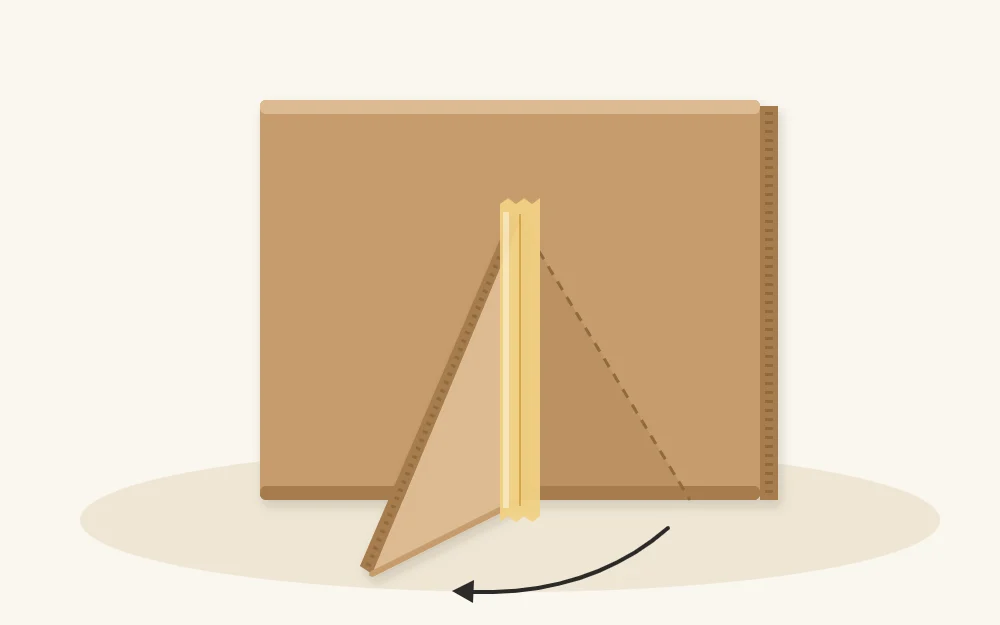
To hang the frame instead, skip the stand. Glue a short loop of twine or ribbon to the top center of the back and cover the ends with a small square of card. The frame is light, so a small nail or a removable adhesive hook rated for its weight is enough.
Slide in the print and adjust
Drop the print into the slot from the top. It rests on the bottom strip, and the window overlaps it by about 1/4 in (6 mm) on each side. If the print slips sideways, tuck a narrow strip of paper beside it.
Keep the frame in a dry room, because corrugated cardboard softens with moisture. Once you are comfortable with these cuts, the same layering idea carries over to layered cardboard wall art, where stacked shapes build a relief panel.
Frequently asked questions
Can I make this frame for a portrait print instead?
Yes. Turn every measurement a quarter turn so the panels stand 8 inches tall and 6 inches wide, and keep the open slot on the top edge. The spacer strips still go along the two sides and the bottom, and the stand is taped to the back the same way.
How do I change the size for a larger print?
Start from the print. Make the window half an inch smaller than the print in both directions, add a border of at least an inch and a quarter all around for the panels, and leave the space between the side strips about half an inch wider than the print.
Why does my frame bow after gluing?
Too much wet glue on one face makes cardboard curl as it dries. Use thin lines of glue, press the frame under books until it is fully dry, and if you paint the front, brush a quick coat on the back panel as well so both sides dry evenly.