Cardboard Wall Art: Layered Relief Panels from Box Scraps
Cut arches, circles and a leaf from a shipping box, stack them in layers, peel a few pieces to show the ribs and paint in two colors for a lightweight relief panel you can hang.

Tutorial at a glance
Materials
- 1 medium corrugated shipping box, clean and dry
- Backing rectangle, about 12 x 16 in (30 x 40 cm)
- White (PVA) glue or tacky glue
- Acrylic craft paint in 2 colors
- Twine or ribbon, about 6 in (15 cm)
- Strong tape for the hanging loop
Cardboard wall art sounds like a school project until you see what layering does to it. Stack a few simple shapes cut from a shipping box, let some of the ribbed inner layer show, and paint the whole thing in three colors: the result reads as a relief panel, with real shadows between the layers.
This project makes one abstract panel of arches, circles and a leaf. Nothing in it needs drawing skill. What it does need is tidy cutting and a little planning before the glue comes out.
What you need
- Corrugated cardboard from one medium shipping box, clean, dry and free of grease
- A backing rectangle, about 12 x 16 in (30 x 40 cm), cut from the flattest part of the box
- Craft knife, cutting mat and metal ruler, plus scissors for small trims
- Pencil, plain paper and a few round objects to trace (a bowl, a mug, a jar lid)
- White (PVA) glue or tacky glue, and a few heavy books
- Acrylic craft paint in two colors, and a flat brush
- Twine or ribbon and strong tape for the hanging loop
Single-wall cardboard, the ordinary kind with one wavy layer, is the right choice. Double-wall board is hard to cut into curves and too thick to stack three deep.
Plan the composition on paper first
Draw the backing rectangle at a small scale on plain paper and sketch a few arrangements. Layered panels look best with a small cast: here that means three arches of decreasing size, two circles and one leaf.
A few guidelines keep an abstract layout from looking random:
- Let shapes overlap. Relief only shows where one piece sits on another.
- Nest the three arches inside one another so they form a rainbow-like stack. That stack is the focal point.
- Place the larger circle partly behind the arches and the smaller one off to a side.
- Leave some of the backing empty. Blank space makes the layers stand out.
- Keep every shape at least 1/2 in (1.3 cm) inside the edge of the backing.
Cut the backing and the shapes
Cut the backing rectangle first, with the knife against the metal ruler. Then draw the shapes on the remaining cardboard. Trace a bowl for the largest arch and smaller round objects for the inner ones, and make each arch band about 1 in (2.5 cm) wide. Draw the leaf freehand as a pointed oval.
Curves are the tricky part. Cut them with the knife in several light passes, turning the cardboard rather than your wrist, and tidy any fuzzy edges with scissors. The guide on how to cut cardboard cleanly covers curves, blade changes and corrugation direction in more detail.
Watch out
Work on a cutting mat, keep the hand that holds the cardboard behind the blade, and cut away from it. If children are helping with the design, an adult does the knife work.
Lay the cut pieces beside the backing in the order you plan to glue them, and compare them with your sketch. This is the moment to recut a shape that turned out too big.

Peel some pieces to show the ribs
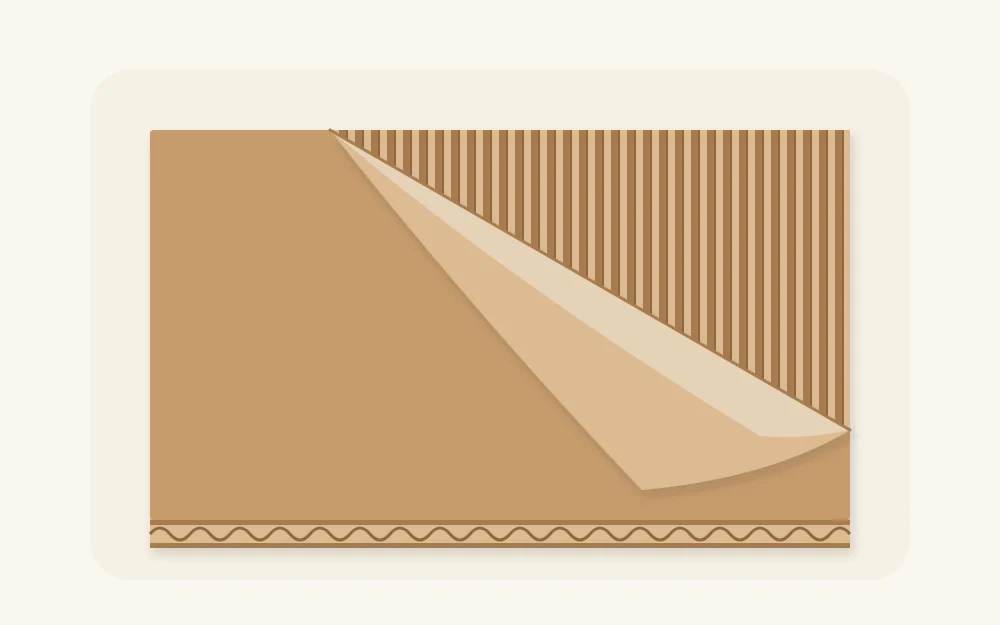
The ribbed texture is what makes the panel look like more than flat card. Corrugated cardboard is a wavy sheet glued between two flat liners, and one liner can be peeled away.
- Choose one or two pieces to texture. A circle and the middle arch are good candidates.
- Lift a corner of the top paper with a fingernail or the knife tip.
- Peel slowly, in the direction the ribs run. Short pulls work better than one long one.
- Where paper stays stuck, dampen it lightly with a barely wet sponge, wait a minute and rub it off with a fingertip.
- Let the piece dry flat before painting.
Tip
Practice on a scrap from the same box first. Some boxes peel in clean sheets and others tear, and it is better to find out on an offcut.
Paint in a limited palette
Two paint colors plus the natural brown of the cardboard are enough. Terracotta and mustard sit well beside bare card; so do white and a single deep blue. More colors than that tend to hide the relief instead of showing it.
Paint the pieces before gluing, so the edges are covered and the backing stays clean. Use thin coats and let each one dry for about 20 to 30 minutes. Heavy, wet paint can make cardboard curl; if a piece does bow, paint the back as well and dry it under a book once it is no longer tacky.
On ribbed pieces, drag an almost dry brush across the ridges so the color catches the tops and the grooves stay darker. Leave at least one shape unpainted.
Glue the layers
- Decide whether to paint the backing or leave it brown, and let it dry.
- Glue the bottom layer first: the largest arch and the larger circle. Spread glue thinly and keep it back from the edges so none squeezes out.
- Add the second layer, the middle arch and the leaf, overlapping the first pieces.
- Finish with the smallest arch and the small circle on top.
- Cover the panel with a sheet of paper, weigh it down with books, and leave it for about an hour. Avoid pressing hard on ribbed pieces, which flatten easily.
Add a hanging loop and put it up
Cut about 6 in (15 cm) of twine, fold it into a loop, and fix the ends to the back of the panel near the top center with glue and a strip of strong tape. Glue a small cardboard square over the ends to lock them in.
The finished panel is very light, so it can hang from a small nail by its loop. If you prefer not to make a hole, removable adhesive strips on the back corners work too; follow the weight guidance on their packaging. Keep the panel out of bathrooms and other damp spots, since moisture softens cardboard.
Variations and what to make next
Three small panels in the same palette make a stronger display than one large one. You can also swap the arches for overlapping leaves, or cut a panel of plain stacked squares.
The same box yields a sturdy cardboard picture frame to hang beside the panel. For a lighter, lacier look, paper tube flower panels use sliced tubes instead of flat shapes.
Frequently asked questions
How do you keep cardboard wall art from warping?
Use thin coats of paint and let each one dry before adding the next. If a piece bows, paint its back as well so both sides pull evenly, then press it under a heavy book once the paint is no longer tacky. Gluing the layers under weight also helps the finished panel stay flat.
What glue works best for layering cardboard?
White (PVA) glue or tacky glue holds cardboard to cardboard well and leaves time to adjust each piece. Spread it thinly and keep it away from the edges. A low-temperature glue gun is quicker, but it sets fast, so positioning has to be right the first time.
Can you hang a cardboard panel without nails?
Yes. A layered panel of this size is very light, so removable adhesive strips on the back corners usually hold it. Check the weight guidance on the strip packaging and press the panel firmly to a clean, dry wall. Avoid damp rooms, where both the cardboard and the adhesive can give way.