Easy Paper Tube Crafts: 6 Simple Projects to Try First
Six quick projects from paper towel and bathroom-tissue tubes, including pen cups, napkin rings and a pillow gift box, with the basic steps for flattening, cutting rings and sealing the card.
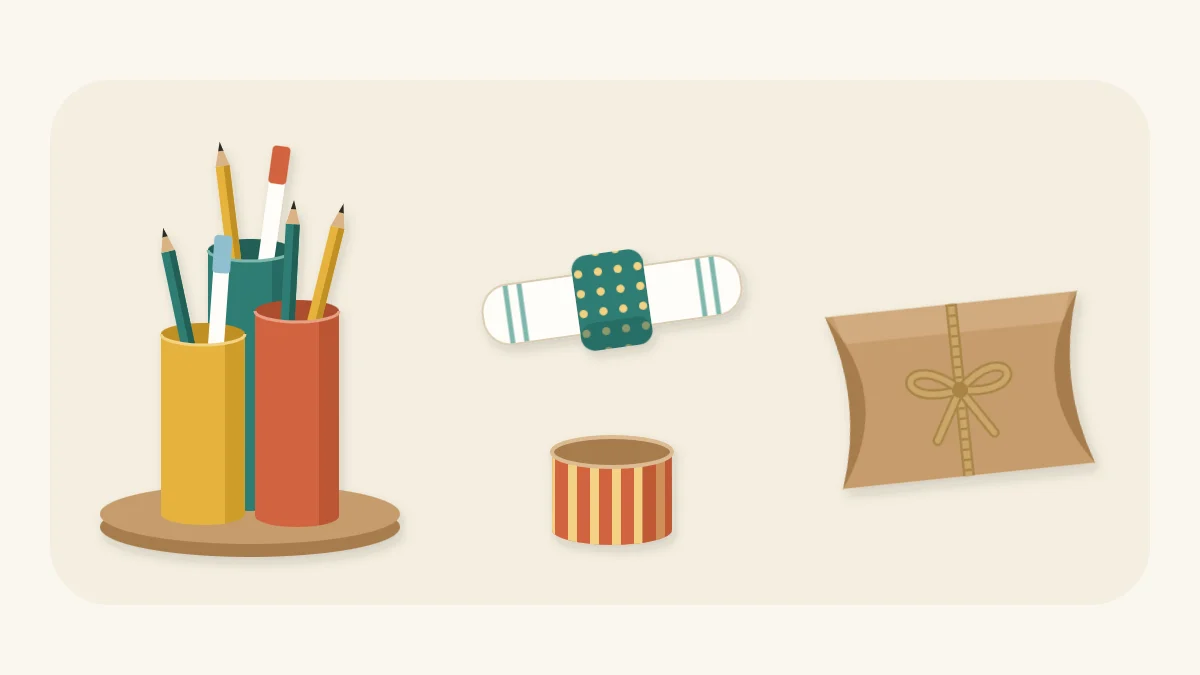
Tutorial at a glance
Materials
- 6 to 8 clean, dry paper tubes
- Acrylic craft paint in two or three colors
- Decorative paper or fabric scraps
- Corrugated cardboard, about 6 x 6 in (15 x 15 cm), for a base
- Twine, about 3 ft (1 m)
- Potting mix and seeds for the starter pots
Paper tube crafts are about as low-stakes as making things gets. The tube is free, it cuts with ordinary scissors, and if a cut goes wrong there is another one along in a few days.
Below are six small projects, each quick enough for an afternoon, plus the three techniques they share: flattening a tube, cutting even rings and sealing the cardboard with paint.
What you need
- Clean, dry paper tubes: bathroom-tissue tubes, or paper towel tubes cut to length
- Scissors, pencil and ruler
- White (PVA) glue or tacky glue
- Acrylic craft paint and a flat brush
- Scraps of decorative paper or fabric
- Twine, and a piece of corrugated cardboard for bases
This is the standard beginner kit. If any item is unfamiliar, the guide to basic tools for recycled crafts explains what each one does.
Use only tubes that are clean, dry and free of stains. Paper towel tubes are made of the same card, so anyone who prefers them can use those for every project here; one long tube equals roughly two or three short ones.
Prepare the tubes
Peel off any loose paper stuck to the outside so the surface is smooth. Then practice the three basic moves on a spare tube.
Flatten
Press the tube flat on the table and run a finger along both folds. A flattened tube is easier to mark and cut, and it springs back into a pointed oval or can be reshaped into a round.
Cut rings
Lay the ruler along the flattened tube and mark it at equal intervals. Marks about 5/8 in (1.6 cm) apart divide a short tube into six rings. Cut straight across at each mark through both layers.

Narrow rings like these are the building block for paper tube wall art, where they are pinched into petals and glued into flower panels.
Seal with paint
Bare tube card is absorbent and scuffs easily. One coat of acrylic paint, inside and out, stiffens the surface and gives glue and paper a better grip. Let it dry for about 30 minutes before the next step.
Projects 1 and 2: pen cups and napkin rings
Desk pen cups
- Paint three tubes and let them dry. For variety, trim one or two shorter.
- Cut a round base about 5 in (13 cm) across from corrugated cardboard and paint it.
- Run glue around the bottom rim of each tube and stand the tubes on the base in a tight cluster.
- Add a line of glue where the tubes touch. Leave the piece to dry for a few hours before loading it with pens.
Napkin rings
- Cut rings about 1 1/2 in (4 cm) wide. A short tube gives two.
- Cut strips of paper or fabric a little wider than the ring and long enough to wrap around it with a small overlap.
- Glue the strip around the ring, then fold the extra width over both edges to the inside.
- Press the seam for a minute and let the rings dry standing on edge.
Projects 3 and 4: cord keeper and pillow gift box
Cord keeper
- Paint a whole tube or cover it with paper.
- Fold a charging cable or extension cord into loops about as long as the tube.
- Slide the bundle inside. The tube stops the loops from tangling in a drawer.
- Draw a simple symbol on the outside so you can tell cords apart.
Pillow gift box
This box suits small, light, non-food gifts such as jewelry, a keychain or a folded note.
- Start with a plain tube, painted or covered if you like.
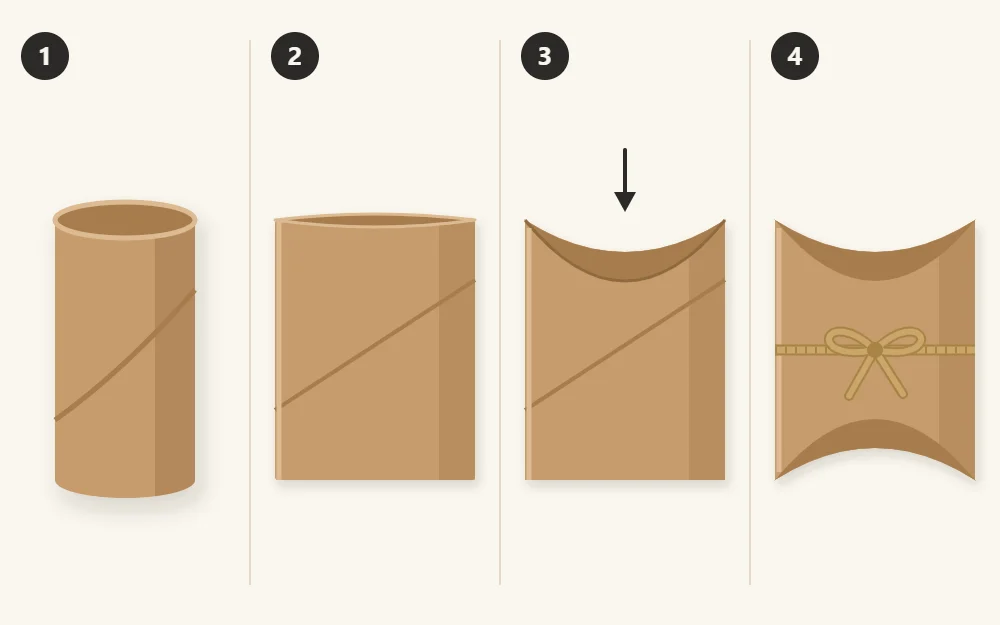
- Flatten the tube and crease both folds firmly.
- At one end, press one side down into a curve with your thumb, then press the opposite side down over it to form a curved flap. Put the gift inside.
- Close the other end the same way and tie the box with twine.
Tip
For a neater flap, lightly trace a curve at each end with a pencil, using a jar lid as a guide, and press along the line with the back of a spoon before folding.
Project 5: stamping shapes
The end of a tube prints a clean ring, and a pinched tube prints other shapes.
- Leave one tube round for circles. Pinch another into a pointed oval for leaves and petals. Crease a third at the top and push the bottom into a point for a heart.
- Spread a thin layer of acrylic paint on a jar lid or scrap of cardboard.
- Dip the tube end in the paint, then press it straight down on paper and lift.
- Repeat in rows or clusters. Reload with paint every two or three prints.
Stamped brown paper makes good gift wrap, and stamped card can be cut into tags.
Project 6: seedling starter pot
Use a plain, unpainted tube for this one.
- Cut a short tube in half to make two pots.
- At one end of each, cut four slits about 3/4 in (2 cm) long, evenly spaced.
- Fold the four flaps inward, overlapping them like the bottom of a box, to form a base.
- Stand the pots close together in a shallow tray, fill with potting mix and sow your seeds.
The card softens as it stays damp, so keep the pots packed side by side in the tray for support and lift them from underneath.
Tidy results and safe handling
A few small habits make tube projects look finished:
- Paint the inside as well as the outside. A bare interior is the first thing people notice.
- Hold glued seams with a clothespin for a few minutes while they set.
- Trim wobbly ends with scissors after flattening the tube, not while it is round.
Watch out
Scissors are all these projects need, but cutting the corrugated base for the pen cups may call for a craft knife. An adult should make that cut on a cutting mat, with a metal ruler and several light passes.
More ways to use the same skills
Once you can flatten a tube and cut even rings, the same steps carry into seasonal projects. The ring pumpkins in recycled fall decorations start from exactly these cuts, tied with twine and topped with a stem.
Keep a small bundle of tubes on hand, held with a rubber band, and you will always have the makings of a quick project.
Frequently asked questions
Can I use paper towel tubes instead of bathroom-tissue tubes?
Yes. Both are made of the same thin card and behave the same way under scissors, glue and paint. A paper towel tube is longer, so cut it into two or three sections to match the shorter size, or leave it whole for a longer cord keeper.
How do I stop paper tubes from looking rough when painted?
Peel away any loose paper first, then brush on thin coats of acrylic paint instead of one thick coat, letting each dry before the next. Paint the inside too. If the spiral seam still shows, cover the tube with a strip of decorative paper glued with a thin layer of white glue.
How long do paper tube seedling pots last?
They are meant for the short seed-starting stage only. The card softens gradually as it stays damp, so the pots hold together best when packed side by side in a tray and lifted from below. Plan on a few weeks of use before the seedlings move on.


