Basic Tools for Recycled Crafts: A Simple Starter Kit
A short, practical starter kit for crafting with boxes, jars, cans and paper: what each tool does, which ones to gather first, which can wait, and the safety habits that go with them.

The tools for recycled crafts are fewer and plainer than most people expect. A pair of scissors, a ruler, a pencil and a bottle of glue will carry you through a surprising number of projects made from boxes, jars, cans and paper.
What follows is a starter kit in two parts: the handful of things to gather first, and the extras worth adding once a project calls for them. Each tool comes with a note on what it actually does, so you can decide what belongs on your own table.
The four essentials
Start here. With these four items you can measure, mark, cut and join paper, thin cardboard, fabric and twine.
- Scissors. A sharp, medium-size pair handles paper, cereal box card, paper tubes and fabric. Keep one pair for paper and, if you can, another for fabric, since paper dulls blades quickly.
- Pencil. Mark every cut before you make it. Pencil lines erase or hide under paint and paper.
- Ruler. A metal ruler of 12 in (30 cm) measures and also guides a blade later on. A plastic ruler measures well but gets nicked by a knife.
- White glue. White (PVA) glue bonds paper, cardboard and fabric, dries clear and washes off hands and brushes with water.

A project such as the tin can pencil holder needs nothing beyond this group, which makes it a good way to test your kit.
Cutting tools: craft knife, mat and metal ruler
Scissors struggle with corrugated cardboard. They crush the edge and tire your hand. For thick board, straight lines and inside cuts such as a frame window, you need a craft knife.
A craft knife works as a set of three. The knife does the cutting, a self-healing cutting mat protects the table and keeps the blade sharp longer, and a metal ruler gives the blade a straight edge to follow. Leave out any one of them and the cut suffers.
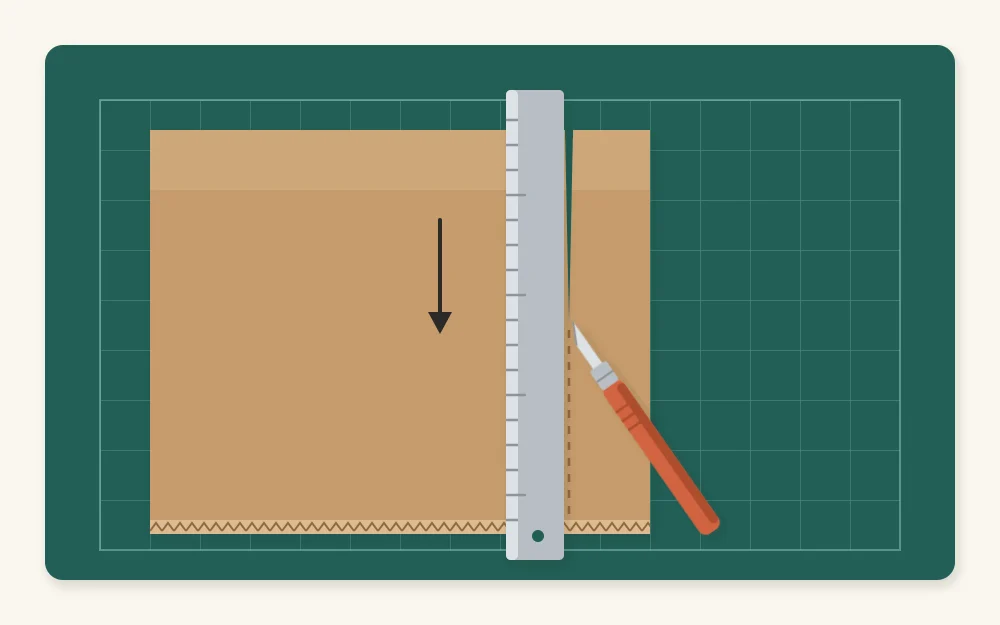
The basic method is simple: hold the ruler firmly, keep your fingers back from its edge and draw the knife along the ruler in several light passes instead of one heavy one. The full technique, including scoring folds and cutting curves, is in the guide on how to cut cardboard cleanly.
Glue and tape
White glue covers most jobs, but three more adhesives fill the gaps.
- Glue stick. Dry and quick, so thin paper does not wrinkle. Best for paper on paper and for layering scraps.
- Low-temperature glue gun. Grabs in seconds and holds bulky or awkward joins, such as twine on a can or a cork on cardboard. The low-temperature kind is easier on fingers and on thin materials.
- Masking tape. Holds pieces in place while glue dries, covers a rough can rim and masks off areas when you paint. It peels away without tearing most surfaces.
Which adhesive suits which pair of materials is its own subject. The breakdown of the best glue for recycled crafts matches glue types to paper, glass, metal and plastic.
Paint and brushes
Acrylic craft paint is the standard choice. It sticks to cardboard, paper, glass and metal, mixes easily, dries in roughly 20 to 30 minutes per coat and cleans up with water while wet.
You need only a few colors to begin: white, black and two or three you like. White lightens any color and works as a base coat over printed cardboard.
Two brushes are enough. A flat brush about 3/4 in (2 cm) wide covers large areas and spreads glue evenly. A small round brush handles edges and details. Wash both as soon as you finish, because dried acrylic ruins bristles.
Small helpers: sandpaper, hole punch and clothespins
These three cost little and solve specific problems.
- Sandpaper. A sheet of medium grit smooths fuzzy cardboard edges and lightly roughens slick metal or plastic so glue and paint grip better.
- Hole punch. Makes clean, round holes for tags, hanging loops and bookmarks. A single-hole punch is the most flexible.
- Clothespins. Spring clothespins act as small clamps, holding glued edges together while they dry. Keep a dozen within reach.
What to get now and what can wait
Buy for the project in front of you, not for every project you might make someday.
| Tool | Main job | When to add it |
|---|---|---|
| Scissors, pencil, ruler, white glue | Measure, mark, cut and join | Before your first project |
| Masking tape and glue stick | Hold, mask and stick thin paper | Before your first project |
| Acrylic paint and two brushes | Color and seal surfaces | When you want painted finishes |
| Craft knife, cutting mat | Cut corrugated cardboard | First cardboard project |
| Low-temperature glue gun | Fast, bulky joins | When white glue is too slow |
| Sandpaper, hole punch, clothespins | Smooth, punch and clamp | As projects call for them |
Tip
Store the whole kit in one shoebox or a large clean can. If everything lives in one place, setting up takes a minute and small tools stop going missing.
Basic safety habits
A few habits cover nearly every risk on a craft table.
- Use a fresh blade. A dull blade needs more pressure and slips more easily. Change it when cuts start to tear instead of slice, and wrap the old blade in tape before you throw it away.
- Cut away from your body. Keep the hand that holds the ruler behind the path of the knife, and cap or retract the blade whenever you put it down.
- Respect the glue gun. Even a low-temperature gun can burn. Rest it on its stand over a scrap of cardboard and unplug it when you are done.
- Ventilate when painting. Open a window when you paint or use rubbing alcohol to degrease a surface.
Watch out
When crafting with children, an adult should handle the craft knife, the glue gun and any hammer work. Scissors sized for small hands, glue sticks and brushes are the right tools to share.
Keeping tools in working order
Tools last when they are cleaned and put away. Wipe glue from scissor blades with a damp cloth before it hardens. Close glue bottles so the nozzle does not clog, and clear a blocked nozzle with a pin.
Rinse brushes in water, reshape the bristles with your fingers and stand them handle-down in a jar to dry. A kit looked after this way stays ready for the next box, jar or can that catches your eye.
Frequently asked questions
Do I need a craft knife, or are scissors enough?
Scissors are enough for paper, paper tubes, fabric and cereal box card. A craft knife becomes worthwhile when you start cutting corrugated cardboard, long straight lines or inside openings such as a frame window. Add a cutting mat and a metal ruler at the same time, because the knife works properly only with both.
What kind of paint works on cardboard, glass and metal?
Acrylic craft paint is the usual choice for all three. It grips cardboard and paper directly, and holds on clean glass or lightly sanded metal when applied in two or three thin coats. It cleans up with water while wet, so wash brushes right after use.
Which tools should children use for recycled crafts?
Children can work with scissors sized for their hands, glue sticks, white glue, pencils and brushes. An adult should do any step that involves a craft knife, a glue gun or a hammer, and should check can rims and glass for sharp spots before the materials reach the table.


