Paper Tube Wall Art: Flower Panels from Sliced Tubes
Slice flattened paper tubes into even rings, pinch them into petals and glue them into flowers that join up as a light, lacy wall panel.

Tutorial at a glance
Materials
- About 8 short or 4 long clean, dry paper tubes
- Tacky glue or white (PVA) glue
- About 20 clothespins
- 1 sheet of wax paper or parchment paper
- Acrylic craft paint (optional)
- Thread, thin twine or removable adhesive strips
Paper tube wall art looks far more intricate than it is. Every part of the design is the same small piece: a ring sliced from a flattened tube and pinched into a petal. Glue five petals together and you have a flower. Glue flowers together and you have an open, lacy panel for the wall.
The project needs no drawing skill, only even cuts and a little patience with glue. It is also forgiving, because you build the panel one flower at a time and can stop whenever the size looks right.
What you need
- Clean, dry paper tubes: about 8 bathroom-tissue tubes or 4 paper towel tubes for a medium panel
- Pencil and ruler
- Sharp scissors
- Tacky glue or white (PVA) glue
- About 20 clothespins
- A sheet of wax paper or parchment paper
- Acrylic craft paint and a small brush (optional)
- Thread, thin twine or removable adhesive strips for hanging
Use only tubes that are clean and dry, with no stains or damp spots. If you prefer not to use bathroom-tissue tubes, paper towel tubes are made of the same card and work in exactly the same way.
Prepare and slice the tubes
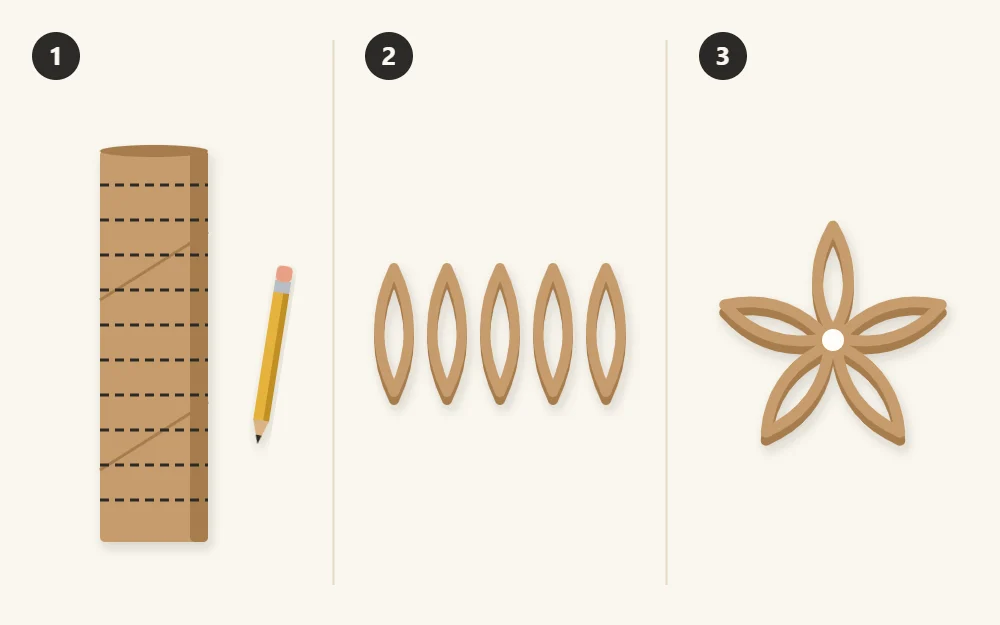
Peel off any loose paper still stuck to the tubes. Then press each tube flat along its length and run the side of the scissors or a ruler along both folds to crease them firmly. Those two creases become the points of every petal.
- On the flattened tube, mark a line every 1/2 in (1.3 cm) along one edge, then again along the other edge.
- Join the marks with the ruler so you have a row of straight cut lines across the tube.
- Cut along each line with scissors. Cut through both layers at once and keep the blades square to the tube.
- Open each ring slightly and pinch its two creases again so it springs into a pointed oval, like a leaf or petal.
A bathroom-tissue tube gives roughly eight rings, and a paper towel tube about twenty. Ring width matters more than anything else in this project: rings of the same width sit flat against the wall, while uneven ones make the panel rock. Sort out any that are clearly wider or narrower and save them for other easy paper tube crafts.
Paint before or after?
You can leave the card its natural brown, which looks good against a white wall. If you want color, decide now when to paint.
| When | Advantage | Drawback |
|---|---|---|
| Before slicing | Fast: paint the outside of whole tubes | Cut edges and insides stay brown |
| After slicing | Easy to mix two colors of petals | Slow, and small rings are fiddly to hold |
| After assembly | One even color over everything, glue spots hidden | Needs a small brush and care to reach inside the petals |
For a two-color design, such as white flowers with teal ones between them, paint the whole tubes first and touch up the edges at the end. Let paint dry completely before gluing, because glue holds poorly on damp card.
Glue the flowers
Lay the wax or parchment paper on a flat table. Glue does not bond to it, so the flowers lift off cleanly once they are dry.
- Take five petals. Put a small dot of glue on the side of one petal, close to its point.
- Press the next petal against it so the two points meet, and clip the pair with a clothespin.
- Add the remaining petals the same way, working around in a circle until all five points meet in the center.
- Lay the flower flat on the paper and nudge the petals until the gaps between them look even.
- Leave it for about 20 to 30 minutes, then remove the clothespins.
Make the first flower slowly and treat it as your pattern. After that, build the rest in batches, moving the clothespins on as each flower sets.
Tip
Tacky glue grabs faster than ordinary white glue, which shortens the clamping time. If you are unsure which adhesive suits card, the guide to the best glue for recycled crafts compares the common types.
Join flowers into a lattice
Arrange the finished flowers on the wax paper before you glue anything. A simple rectangle of three flowers by three is a good first panel. You could also try a loose circle, a diamond, or a staggered line to hang above a doorway.
Turn the flowers until the outer tips of neighboring petals touch. Each flower should meet its neighbors in at least two places, because a single joint acts as a hinge and lets the panel sag. Then glue each contact point with a small dot and clip it with a clothespin.
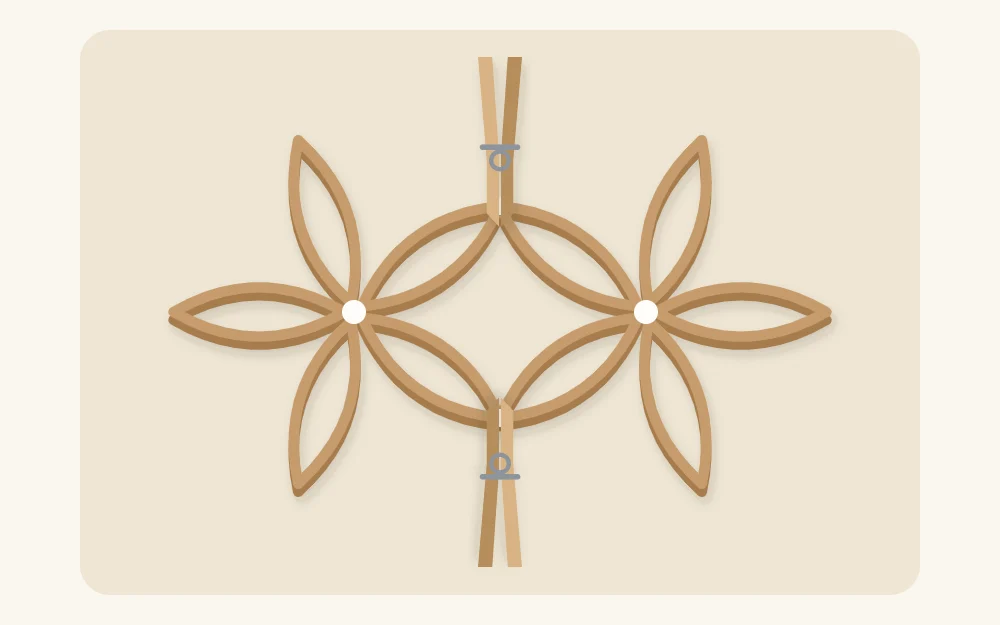
Where a gap looks too open, glue a single petal into it. Loose petals between flowers tie the lattice together and make it noticeably stiffer. Leave the whole panel flat on the paper overnight before you lift it.
Finish and hang the panel
Peel the panel off the paper and check the back for stray threads of glue, which pull away easily. Touch up any bare cut edges with paint. If you painted after assembly, two thin coats cover better than one heavy one and are less likely to soften the card.
The finished piece weighs very little, so hanging is simple:
- Tie a loop of thread or thin twine through a top petal and hang it from a small nail or pin.
- Press two or three removable adhesive strips to flat spots on the back.
- For a wide panel, use two loops so it hangs level.
Hang it in a dry room, away from steam. Paper tube card softens in humid air, so a bathroom or a spot above the stove is not a good place for it.
Take the idea further
Once the basic flower is familiar, change one thing at a time. Six or eight petals make a fuller bloom. Narrower rings look more delicate, and wider ones cast deeper shadows. For a heavier, more solid style of decoration made from boxes instead of tubes, look at layered cardboard wall art.
Frequently asked questions
How many tubes do I need for one panel?
It depends on ring width and panel size. With half-inch rings, a nine-flower panel of five-petal flowers uses 45 petals plus a few fillers, which is roughly six to eight short tubes or three to four long ones. Cut a few extra rings so you can discard uneven ones.
Can I use a glue gun instead of white glue?
Yes, a low-temperature glue gun sets in seconds, so you can skip most of the clamping. It leaves thin strings that need pulling off afterward, and the tip and glue are hot enough to burn, so an adult should handle it when children are helping.
Why does my panel not lie flat against the wall?
Usually the rings were cut to different widths or the panel was moved before the glue had set. Assemble everything flat on wax paper, leave it overnight, and check ring width with a ruler before gluing. A light book laid on top while it dries also helps.


