Plastic Bottle Planter: A Self-Watering Pot for Herbs
Build a wicking planter from one clean beverage bottle: cut it in two, invert the top into the base, thread a cotton wick through the cap, then plant a small herb and fill the reservoir.

Tutorial at a glance
Materials
- 1 clean plastic beverage bottle with cap, 1 to 2 liters (about 1 to 2 qt)
- Cotton string or cotton fabric strip, about 8 in (20 cm)
- Potting mix
- 1 small herb plant
- Masking tape or cloth tape
A plastic bottle planter built as a wicking pot solves the most common problem with windowsill herbs: uneven watering. The top half of the bottle holds the plant, the bottom half holds water, and a cotton wick carries moisture up between them a little at a time.
The build takes one clean beverage bottle, a piece of string and a few minutes of careful cutting. After that, looking after the plant is mostly a matter of glancing at the water level.
What you need
- 1 clear plastic beverage bottle with its cap, 1 to 2 liters (about 1 to 2 qt)
- Cotton string, or a strip of cotton fabric, about 8 in (20 cm) long
- Potting mix
- 1 small herb plant, such as basil, mint or parsley
- Masking tape or cloth tape
- Permanent marker, craft knife and scissors
- Hammer, a nail and a scrap wood block
The general kit is covered in the guide to basic tools for recycled crafts if you are missing anything.
Choose and prepare the bottle
Use only a bottle that held a drink, such as water, soda or juice. Bottles that held cleaning products, garden chemicals, motor oil or anything you cannot identify are not suitable for a planter, however well they are rinsed. The article on craft materials worth saving lists what to keep and what to skip.
A straight-sided bottle is easiest to cut and gives the neatest fit. Wash it and the cap in warm soapy water, rinse well and peel off the label. Let both dry.
Choose cotton for the wick. Cotton string, a strip cut from an old cotton T-shirt or a length of cotton shoelace all draw water well. Many synthetic cords do not, so test an unknown string by dipping one end in water and watching whether the damp climbs.
Cut the bottle in two
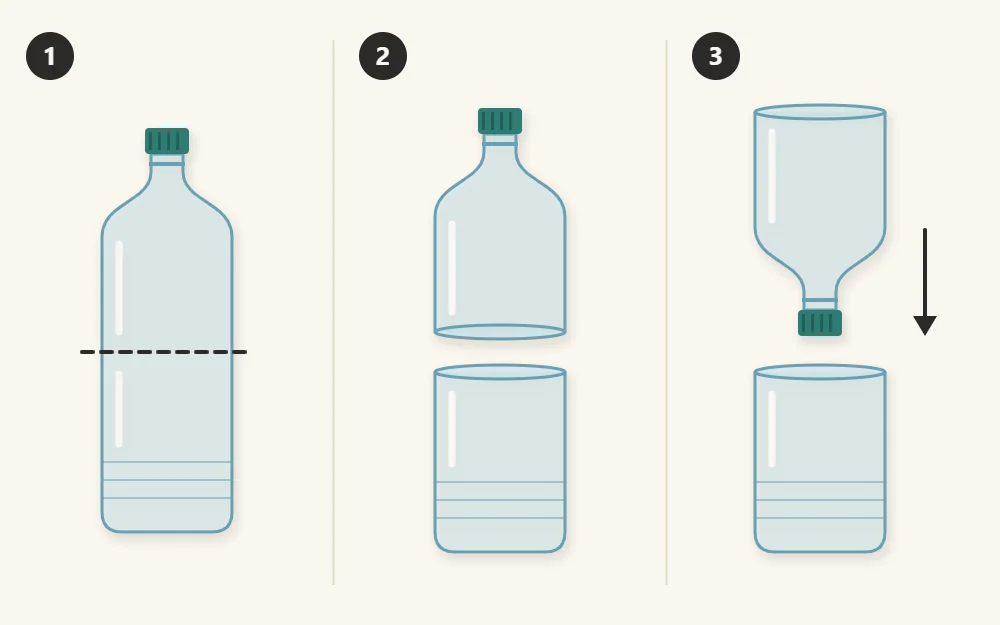
Wrap a strip of masking tape around the bottle a little above the middle, so the bottom section is slightly taller than the top, and use the tape edge as a guide to draw a line all the way around.
- Lay the bottle on its side on a cutting mat and hold it firmly near the base, well away from the line.
- Press the tip of the craft knife into the line to make a short slit, cutting away from your holding hand.
- Put the knife down. Slip one scissor blade into the slit and cut around the line, turning the bottle as you go.
- Trim any jagged spots, then fold masking tape or cloth tape over both cut edges so no sharp plastic is exposed.
- Turn the top half upside down and lower it into the base to check the fit. The cap should hang above the bottom of the base, leaving room for water.
Watch out
An adult should do the knife and hammer steps. Thin bottle plastic can slip or split, so start the cut with light pressure and cover the cut edges with tape before anyone handles the pieces.
Make and thread the wick
- Unscrew the cap and set it flat, top side down, on the wood block.
- Hold a nail upright in the center of the cap and tap it through with the hammer. Wiggle the nail to widen the hole until your string fits snugly.
- Fold the string in half and push the folded end through the hole from the inside of the cap, so a loop of about 2 in (5 cm) sits on the inside and the two tails hang out the other side.
- Tie a loose knot in the loop to stop it sliding back through, then screw the cap onto the bottle top.
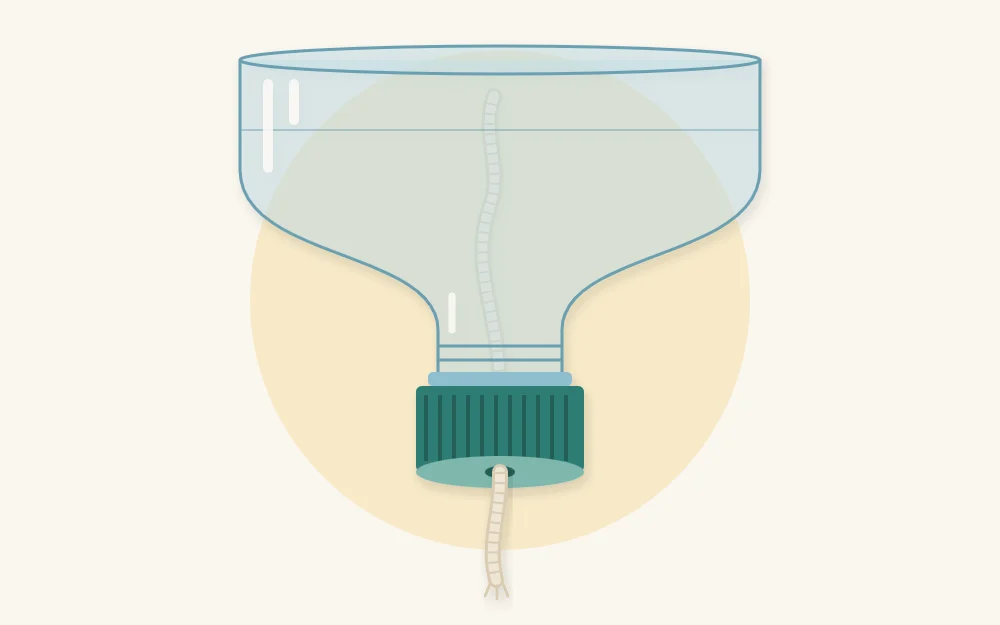
With the top half inverted, the knotted loop sits inside where the potting mix will go and the tails hang down into the reservoir. Trim the tails so they just touch the bottom of the base.
Plant and fill
- Soak the wick under the tap so it starts out wet.
- Hold the loop upright in the neck and add potting mix around it, so the wick runs up through the soil instead of lying at the bottom.
- Fill to about halfway, set the herb in place and add mix around the roots. Firm it gently and stop 1 in (2.5 cm) below the taped rim.
- Pour water into the base until it is about one third full, then lower the planted top into it.
- Water the soil once from above. This settles the mix and connects the damp soil to the wick.
Tip
Moisten dry potting mix in a bowl before planting. Very dry mix can resist water at first, and a wick works best when the soil around it is already damp.
Light, refilling and wick care
Most kitchen herbs want a bright spot, such as a windowsill that gets several hours of sun. Turn the planter every few days so the plant grows evenly.
Because the bottle is clear, the water level is easy to check. Refill when the tails of the wick are close to losing contact with the water. Lift the top half out, pour in fresh water and set it back. Every two weeks or so, empty the base completely and rinse it before refilling.
Clear plastic lets light reach the water, and green algae may appear on the inside of the base. It is mostly a cosmetic problem. A band of paper or fabric wrapped around the base and held with tape blocks the light; leave a narrow gap so you can still see the level.
Replace the wick if the soil stays dry while the base still holds water, or if the string looks slimy or frayed. That may be after a few months. Slide the old one out through the cap, thread a new one and repot.
If something is not working
- Soil stays dry: the wick is synthetic, too thin or not touching the water. Use thicker cotton or double it.
- Soil is soggy: the wick is too thick for the plant. Swap to a single thin string, or let the base run empty for a day or two between refills.
- Top half tips over: the plant has outgrown the bottle. Move it to a larger container.
Herbs that prefer drier roots, such as rosemary and thyme, are usually happier in a pot with drainage holes. Tin can planters suit them better.
Frequently asked questions
Which herbs grow well in a self-watering bottle planter?
Herbs that like evenly moist soil do best, including basil, mint, parsley and chives. Herbs from dry climates, such as rosemary, thyme and sage, tend to struggle with constantly damp roots and are better in a pot with drainage holes that can dry out between waterings.
How often does the base need refilling?
It depends on the plant, the size of the bottle and how warm and bright the spot is. A small herb on a sunny windowsill may empty the base within a week, while the same plant in cooler weather takes longer. Check the level every few days until you learn its pace.
What can I use for a wick if I have no cotton string?
A strip about 1/2 in (1.3 cm) wide cut from an old cotton T-shirt works well, as does a cotton shoelace or a few strands of cotton yarn twisted together. Test any material first by dipping one end in water. If the damp climbs up within a few minutes, it will wick.